Creative, recycled and repurposed
Published 12:00 pm Friday, June 17, 2016

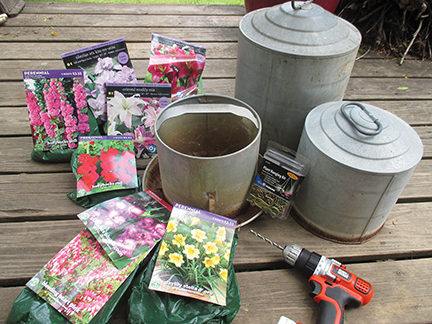
- colleen b. mcchesney Galvanized feeders and water containers make perfect garden containers for bulbs and rooted plants.
By Colleen B. McChesney
Master Gardener
Coming up with new ideas for the garden isn’t always an easy task, but it does make for an interesting and challenging one each season and year.
Every five years or so I like to assess what is going on in my yard and gardens, and make some changes in the design to spice things up.
Recently as with all things, it comes time to do some annual maintenance, tossing out old items or replacing old containers for new ones. This year I’ve repurposed some unique items into new containers for bulbs and short rooted plants that don’t require a lot of room or space, which are perfect for folks who live in apartments or in the city without large yards, plus saving money to buy new ones.
Every gardener should have a cordless drill with a quarter-inch drill bit and a half-inch drill bit in their tool kit or garden tool shed. These valuable tools help with proper drainage for any item you’d like to make into that perfect container.
The size of the container will determine which size drill bit to use and how many drainage holes are placed on the item becoming the new container. When buying your drill bits, make sure you get ones that can be used for wood, metal and ceramic (the general all-purpose ones). Also invest in a good pair of safety glasses for when using your drill.
Other useful items to buy or keep on hand are S-hooks in various sizes, assorted lengths of small-link chains (12, 24 and 36 inches) depending on how much height is needed to hang your container, a roll of landscape fabric to use as a liner for your pots and some sharp scissors. (Make sure that they aren’t from the family seamstress’ sewing box though. Buy an extra pair.) Some spray cans of exterior outdoor paint in any color of your choosing would be nice too.
So what do you have just laying around that no longer serves its original purpose that you can repurpose or recycle into a cool new container? That old rusted wheelbarrow can become a small fairy garden, herb garden, or a great Dahlia bulbs pot with a couple of half-inch holes spaced just right. The old wheel and frame can become a great trellis when it’s stood on end to add some interest to your climbing vine plants.
With the downsizing of our flock and the manager going off to college this fall, I’ve had abundance of old galvanized 1-gallon to 5-gallon feeders and water containers piling up next to the henhouse. These are perfect planters and each one will produce two containers, a free standing pot and a hanging pot, and what gardener has all the pots they need.
Separate the tops and bottoms of both the feeders and waterers. Take a top piece and drill a quarter-inch hole on each side of the handle for drainage. Locate the pre-drilled hole from the factory on the lip edge toward the bottom. Drill two more quarter-inch holes about one-third of length from the original pre-drilled hole, making sure to drill them close to the lip edge like the original hole. Carefully work a small S-hook into each hole then lace a separate 18-inch chain on each S-hook and gather the other ends together with a fourth larger S-hook to make the top of your new hanging pot. Now, cut some landscaping fabric to line the inside of your pot to protect the metal from the soil. Fill with garden soil and whatever plants. These will weigh about 10 to 15 pounds so you will want to hang them from a sturdy rafter or post.
For the bottom piece to become a free-standing pot just drill a half-inch hole on the center of the bottom of the container. Cut landscape fabric to line the pot, fill with garden soil, and your plant of choice — perhaps a Spider Lily.
Give these a try and see what creative containers you can come with to add some character and spice to your own landscape.
Colleen B. McChesney is a Lafayette County Master Gardener. To arrange for a free consultation with a Master Gardener about your gardening challenges, call the Lafayette County Extension office at 662-234-4451 or visit Lcmga.org.


